반응형
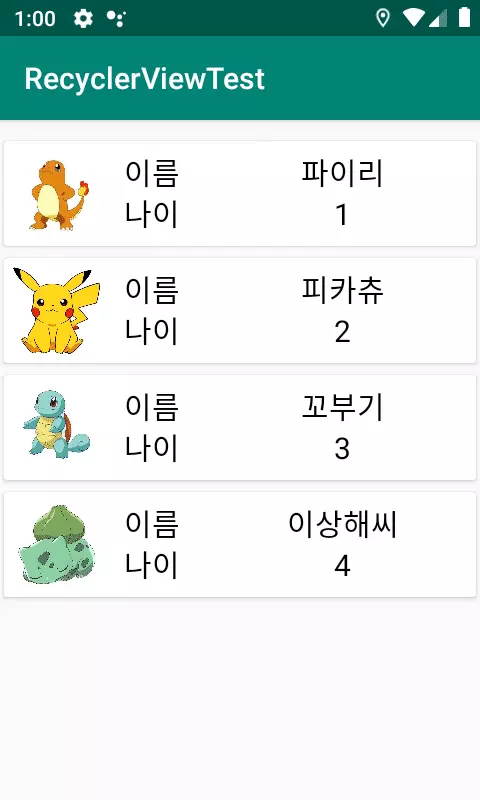
리싸이클러뷰의 아이템을 스와이프 했을때 이벤트를 만드는 예제를 만들어보겠습니다.
이전에 포스팅했던 리싸이클러뷰와 ItemTouchHelper를 활용해서 만들었습니다.
링크를 참고하시면 이해하시는데 더 도움이 되실 것 같습니다.
1. list_item.xml
<?xml version="1.0" encoding="utf-8"?>
<FrameLayout xmlns:android="http://schemas.android.com/apk/res/android"
    xmlns:app="http://schemas.android.com/apk/res-auto"
    android:layout_width="match_parent"
    android:layout_height="wrap_content"
    android:orientation="horizontal">
    <androidx.cardview.widget.CardView
        android:layout_width="match_parent"
        android:layout_height="match_parent"
        app:cardBackgroundColor="#FFFFFF"
        app:cardUseCompatPadding="true">

        <LinearLayout
            android:layout_width="match_parent"
            android:layout_height="wrap_content"
            android:orientation="horizontal">

            <ImageView
                android:id="@+id/list_image"
                android:layout_width="70dp"
                android:layout_height="70dp"
                android:padding="5dp"
                app:srcCompat="@mipmap/ic_launcher" />

            <TableLayout
                android:gravity="center"
                android:stretchColumns="1"
                android:layout_width="wrap_content"
                android:layout_height="match_parent"
                android:layout_weight="1">

                <TableRow>

                    <TextView
                        android:layout_width="wrap_content"
                        android:layout_height="wrap_content"
                        android:layout_gravity="left"
                        android:layout_marginLeft="10dp"
                        android:textColor="@android:color/black"
                        android:text="이름"
                        android:textSize="20sp" />

                    <TextView
                        android:id="@+id/list_name"
                        android:textColor="@android:color/black"
                        android:layout_width="wrap_content"
                        android:layout_height="wrap_content"
                        android:layout_gravity="center"
                        android:textSize="20sp" />

                </TableRow>


                <TableRow>

                    <TextView
                        android:textColor="@android:color/black"
                        android:layout_width="wrap_content"
                        android:layout_height="wrap_content"
                        android:layout_gravity="left"
                        android:layout_marginLeft="10dp"
                        android:text="나이"
                        android:textSize="20sp" />

                    <TextView
                        android:id="@+id/list_age"
                        android:textColor="@android:color/black"
                        android:layout_width="wrap_content"
                        android:layout_height="wrap_content"
                        android:layout_gravity="center"
                        android:textSize="20sp" />
                </TableRow>


            </TableLayout>


        </LinearLayout>

    </androidx.cardview.widget.CardView>


</FrameLayout>
2. customdialog.xml
<?xml version="1.0" encoding="utf-8"?>
<LinearLayout xmlns:android="http://schemas.android.com/apk/res/android"
    android:background="#FFFFFF"
    android:orientation="vertical"
    android:layout_width="match_parent"
    android:layout_height="match_parent">

    <LinearLayout
        android:layout_margin="10dp"
        android:layout_width="match_parent"
        android:layout_height="wrap_content">
        <TextView
            android:gravity="center"
            android:textColor="@android:color/black"
            android:textSize="20sp"
            android:text="이름"
            android:layout_width="0dp"
            android:layout_height="match_parent"
            android:layout_weight="3"/>
        <EditText
            android:id="@+id/mod_name"
            android:selectAllOnFocus="true"
            android:gravity="center"
            android:imeOptions="actionNext"
            android:inputType="text"
            android:layout_width="0dp"
            android:layout_height="match_parent"
            android:layout_weight="7"/>

    </LinearLayout>
    <LinearLayout
        android:layout_margin="10dp"
        android:layout_width="match_parent"
        android:layout_height="wrap_content">
        <TextView
            android:gravity="center"
            android:textColor="@android:color/black"
            android:textSize="20sp"
            android:text="나이"
            android:layout_width="0dp"
            android:layout_height="match_parent"
            android:layout_weight="3"/>
        <EditText
            android:id="@+id/mod_age"
            android:selectAllOnFocus="true"
            android:gravity="center"
            android:inputType="number"
            android:imeOptions="actionDone"
            android:layout_width="0dp"
            android:layout_height="match_parent"
            android:layout_weight="7"/>

    </LinearLayout>

    <Button
        android:id="@+id/mod_bt"
        android:layout_margin="10dp"
        android:text="수정"
        android:textSize="20sp"
        android:textColor="@android:color/black"
        android:layout_width="match_parent"
        android:layout_height="wrap_content" />


</LinearLayout>
참고
android:selectAllOnFocus="true"
true로 설정을 해주면 EditText를 선택했을때 EditText의 텍스트가 모두 선택이 된 상태가됩니다.
3. activity.xml
<?xml version="1.0" encoding="utf-8"?>
<LinearLayout xmlns:android="http://schemas.android.com/apk/res/android"
    xmlns:tools="http://schemas.android.com/tools"
    android:layout_width="match_parent"
    android:layout_height="match_parent"
    android:orientation="vertical"
    tools:context=".MainActivity">


    <androidx.recyclerview.widget.RecyclerView
        android:layout_marginTop="10dp"
        android:id="@+id/rv"
        android:layout_width="match_parent"
        android:layout_height="wrap_content"/>


</LinearLayout>
4. Person.java
public class Person {
    int image;
    String name;
    int age;

    public Person(int image, String name, int age){
        this.image = image;
        this.name = name;
        this.age = age;
    }

    public int getImage() {
        return image;
    }

    public void setImage(int image) {
        this.image = image;
    }


    public String getName() {
        return name;
    }

    public void setName(String name) {
        this.name = name;
    }

    public int getAge() {
        return age;
    }

    public void setAge(int age) {
        this.age = age;
    }
}
5. ItemTouchHelperListener.interface
import androidx.recyclerview.widget.RecyclerView;

public interface ItemTouchHelperListener {
    boolean onItemMove(int from_position, int to_position);
    void onItemSwipe(int position);
    void onLeftClick(int position, RecyclerView.ViewHolder viewHolder);
    void onRightClick(int position, RecyclerView.ViewHolder viewHolder);
}
6. ItemTouchHelperCallback.java
import android.graphics.Canvas;
import android.graphics.Color;
import android.graphics.Paint;
import android.graphics.RectF;
import android.view.MotionEvent;
import android.view.View;
import androidx.annotation.NonNull;
import androidx.recyclerview.widget.ItemTouchHelper;
import androidx.recyclerview.widget.RecyclerView;


enum ButtonsState{
    GONE,
    LEFT_VISIBLE,
    RIGHT_VISIBLE
}

public class ItemTouchHelperCallback extends ItemTouchHelper.Callback {


    private ItemTouchHelperListener listener;
    private boolean swipeBack = false;
    private ButtonsState buttonsShowedState = ButtonsState.GONE;
    private static final float buttonWidth = 115;
    private RectF buttonInstance = null;
    private RecyclerView.ViewHolder currenrtItemViewHolder = null;

    public ItemTouchHelperCallback(ItemTouchHelperListener listener) {
        this.listener = listener;
    }


    @Override
    public int getMovementFlags(@NonNull RecyclerView recyclerView, @NonNull RecyclerView.ViewHolder viewHolder) {
        int drag_flags = ItemTouchHelper.UP|ItemTouchHelper.DOWN;
        int swipe_flags = ItemTouchHelper.START|ItemTouchHelper.END;
        return makeMovementFlags(drag_flags,swipe_flags);
    }

    @Override
    public boolean isLongPressDragEnabled() {
        return true;
    }

    @Override
    public boolean onMove(@NonNull RecyclerView recyclerView, @NonNull RecyclerView.ViewHolder viewHolder, @NonNull RecyclerView.ViewHolder target) {

        return listener.onItemMove(viewHolder.getAdapterPosition(),target.getAdapterPosition());
    }

    @Override
    public void onSwiped(@NonNull RecyclerView.ViewHolder viewHolder, int direction) {
        listener.onItemSwipe(viewHolder.getAdapterPosition());
    }

    //아이템을 터치하거나 스와이프하거나 뷰에 변화가 생길경우 불러오는 함수
    @Override
    public void onChildDraw(@NonNull Canvas c, @NonNull RecyclerView recyclerView, @NonNull RecyclerView.ViewHolder viewHolder, float dX, float dY, int actionState, boolean isCurrentlyActive) {
        //아이템이 스와이프 됐을경우 버튼을 그려주기 위해서 스와이프가 됐는지 확인
        if(actionState == ItemTouchHelper.ACTION_STATE_SWIPE){
            if(buttonsShowedState != ButtonsState.GONE){
                if(buttonsShowedState == ButtonsState.LEFT_VISIBLE) dX = Math.max(dX, buttonWidth);
                if(buttonsShowedState == ButtonsState.RIGHT_VISIBLE) dX = Math.min(dX, -buttonWidth);
                super.onChildDraw(c, recyclerView, viewHolder, dX, dY, actionState, isCurrentlyActive);

            }else{
                setTouchListener(c, recyclerView, viewHolder, dX, dY, actionState, isCurrentlyActive);
            }

            if(buttonsShowedState == ButtonsState.GONE){
                super.onChildDraw(c, recyclerView, viewHolder, dX, dY, actionState, isCurrentlyActive);
            }

        }
        currenrtItemViewHolder = viewHolder;

        //버튼을 그려주는 함수
        drawButtons(c, currenrtItemViewHolder);


    }

    private void drawButtons(Canvas c, RecyclerView.ViewHolder viewHolder){

        float buttonWidthWithOutPadding = buttonWidth - 10;
        float corners = 5;

        View itemView = viewHolder.itemView;
        Paint p = new Paint();

        buttonInstance = null;


        //오른쪽으로 스와이프 했을때 (왼쪽에 버튼이 보여지게 될 경우)
        if(buttonsShowedState == ButtonsState.LEFT_VISIBLE){
            RectF leftButton = new RectF(itemView.getLeft() + 10, itemView.getTop() + 10, itemView.getLeft() + buttonWidthWithOutPadding,
                    itemView.getBottom() - 10);
            p.setColor(Color.BLUE);
            c.drawRoundRect(leftButton, corners, corners, p);
            drawText("수정", c, leftButton, p);
            buttonInstance = leftButton;

        //왼쪽으로 스와이프 했을때 (오른쪽에 버튼이 보여지게 될 경우)
        }else if(buttonsShowedState == ButtonsState.RIGHT_VISIBLE){
            RectF rightButton = new RectF(itemView.getRight() - buttonWidthWithOutPadding, itemView.getTop() + 10, itemView.getRight() -10,
                    itemView.getBottom() - 10);
            p.setColor(Color.RED);
            c.drawRoundRect(rightButton, corners, corners, p);
            drawText("삭제", c, rightButton, p);

            buttonInstance = rightButton;
        }

    }

    //버튼의 텍스트 그려주기
    private void drawText(String text, Canvas c, RectF button, Paint p){
        float textSize = 25;
        p.setColor(Color.WHITE);
        p.setAntiAlias(true);
        p.setTextSize(textSize);

        float textWidth = p.measureText(text);
        c.drawText(text, button.centerX() - (textWidth/2), button.centerY() + (textSize/2), p);
    }

    @Override
    public int convertToAbsoluteDirection(int flags, int layoutDirection) {
        if(swipeBack){
            swipeBack = false;
            return 0;
        }
        return super.convertToAbsoluteDirection(flags, layoutDirection);
    }


    private void setTouchListener(final Canvas c, final RecyclerView recyclerView,
                                  final RecyclerView.ViewHolder viewHolder,
                                  final float dX, final float dY, final int actionState,
                                  final boolean isCurrentlyActive){
        recyclerView.setOnTouchListener(new View.OnTouchListener() {
            @Override
            public boolean onTouch(View v, MotionEvent event) {
                swipeBack = event.getAction() == MotionEvent.ACTION_CANCEL || event.getAction() == MotionEvent.ACTION_UP;
                if(swipeBack){
                    if(dX < -buttonWidth) buttonsShowedState = ButtonsState.RIGHT_VISIBLE;

                    else if(dX > buttonWidth) buttonsShowedState = ButtonsState.LEFT_VISIBLE;


                    if(buttonsShowedState != ButtonsState.GONE){
                        setTouchDownListener(c, recyclerView, viewHolder, dX, dY, actionState, isCurrentlyActive);
                        setItemsClickable(recyclerView, false);
                    }
                }
                return false;
            }
        });
    }

    private void setTouchDownListener(final Canvas c, final RecyclerView recyclerView
            , final RecyclerView.ViewHolder viewHolder, final float dX, final float dY
            , final int actionState, final boolean isCurrentlyActive){
        recyclerView.setOnTouchListener(new View.OnTouchListener() {
            @Override
            public boolean onTouch(View v, MotionEvent event) {
                if(event.getAction() == MotionEvent.ACTION_DOWN){
                    setTouchUpListener(c, recyclerView, viewHolder, dX, dY, actionState, isCurrentlyActive);
                }
                return false;
            }
        });
    }

    private void setTouchUpListener(final Canvas c, final RecyclerView recyclerView
            , final RecyclerView.ViewHolder viewHolder, final float dX, final float dY
            , final int actionState, final boolean isCurrentlyActive){

        recyclerView.setOnTouchListener(new View.OnTouchListener() {
            @Override
            public boolean onTouch(View v, MotionEvent event) {
                ItemTouchHelperCallback.super.onChildDraw(c, recyclerView, viewHolder, 0F, dY, actionState, isCurrentlyActive);
                recyclerView.setOnTouchListener(new View.OnTouchListener() {
                    @Override
                    public boolean onTouch(View v, MotionEvent event) {
                        return false;
                    }
                });

                setItemsClickable(recyclerView, true);
                swipeBack = false;

                if(listener != null && buttonInstance != null && buttonInstance.contains(event.getX(), event.getY())){
                    if(buttonsShowedState == ButtonsState.LEFT_VISIBLE){
                        listener.onLeftClick(viewHolder.getAdapterPosition(), viewHolder);
                    }else if(buttonsShowedState == ButtonsState.RIGHT_VISIBLE){
                        listener.onRightClick(viewHolder.getAdapterPosition(), viewHolder);
                    }
                }

                buttonsShowedState = ButtonsState.GONE;
                currenrtItemViewHolder = null;
                return false;
            }
        });
    }

    private void setItemsClickable(RecyclerView recyclerView, boolean isClickable){
        for(int i = 0; i < recyclerView.getChildCount(); i++){
            recyclerView.getChildAt(i).setClickable(isClickable);
        }
    }

}
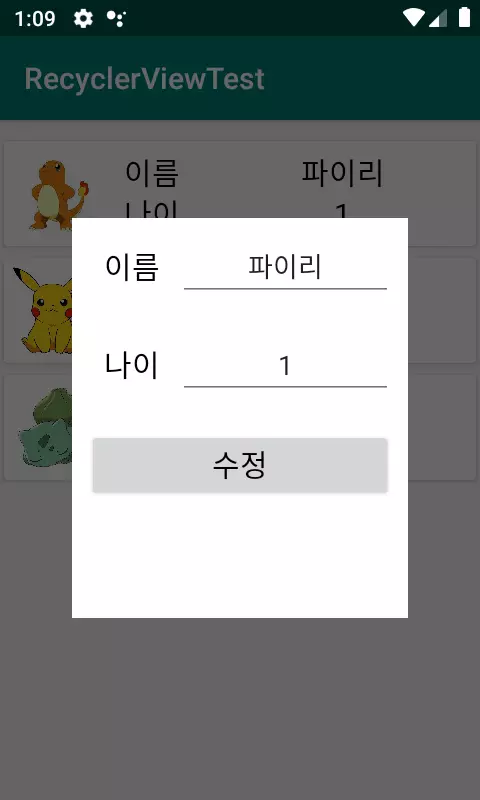
버튼을 띄워주는 이벤트는 단시간에 이해하기 힘들기 때문에 링크를 통해서 확인하시고 천천히 직접 하나씩 코딩해보시면서 이해하시면 도움이 되실것 같습니다.
7. OnDialogListener.interface
public interface OnDialogListener {
    void onFinish(int position, Person person);
}
다이얼로그가 종료될때 다이얼로그의 EditText에 입력한 값을 받아오기 위한 인터페이스입니다.
8. CustomDialog.java
import android.app.Dialog;
import android.content.Context;
import android.graphics.Color;
import android.graphics.drawable.ColorDrawable;
import android.view.View;
import android.view.Window;
import android.widget.Button;
import android.widget.EditText;

public class CustomDialog extends Dialog {
    private OnDialogListener listener;
    private Context context;
    private Button mod_bt;
    private EditText mod_name, mod_age;
    private String name;
    private int image,age;
    public CustomDialog(Context context,final int position, Person person){
        super(context);
        requestWindowFeature(Window.FEATURE_NO_TITLE);
        getWindow().setBackgroundDrawable(new ColorDrawable(Color.TRANSPARENT));
        setContentView(R.layout.customdialog);

        name = person.getName();
        age = person.getAge();
        image = person.getImage();

        //이름, 나이 EditText에 값 채우기
        mod_name = findViewById(R.id.mod_name);
        mod_name.setText(name);

        mod_age = findViewById(R.id.mod_age);
        mod_age.setText(String.valueOf(age));

        mod_bt = findViewById(R.id.mod_bt);
        mod_bt.setOnClickListener(new View.OnClickListener() {
            @Override
            public void onClick(View v) {
                if(listener!=null){
                    //EditText의 수정된 값 가져오기
                    String name = mod_name.getText().toString();
                    int age = Integer.parseInt(mod_age.getText().toString());
                    Person person = new Person(image,name, age);

                    //Listener를 통해서 person객체 전달
                    listener.onFinish(position, person);

                    //다이얼로그 종료
                    dismiss();
                }
            }
        });
    }

    public void setDialogListener(OnDialogListener listener){
        this.listener = listener;
    }


}
9. ListAdapter.java
import android.app.AlertDialog;
import android.content.Context;
import android.util.DisplayMetrics;
import android.view.LayoutInflater;
import android.view.View;
import android.view.ViewGroup;
import android.view.WindowManager;
import android.widget.ImageView;
import android.widget.TextView;
import androidx.annotation.NonNull;
import androidx.recyclerview.widget.RecyclerView;
import java.util.ArrayList;

public class ListAdapter extends RecyclerView.Adapter<ListAdapter.ItemViewHolder>
            implements ItemTouchHelperListener, OnDialogListener{

    ArrayList<Person> items = new ArrayList<>();
    Context context;
    public ListAdapter(Context context){
        this.context = context;
    }


    @NonNull
    @Override
    public ItemViewHolder onCreateViewHolder(@NonNull ViewGroup parent, int viewType) {
        //LayoutInflater를 이용해서 원하는 레이아웃을 띄워줌
        LayoutInflater inflater = LayoutInflater.from(parent.getContext());
        View view = inflater.inflate(R.layout.list_item, parent, false);
        return new ItemViewHolder(view);
    }

    @Override
    public void onBindViewHolder(@NonNull ItemViewHolder holder, int position) {
        //ItemViewHolder가 생성되고 넣어야할 코드들을 넣어준다.
        holder.onBind(items.get(position));
    }

    @Override
    public int getItemCount() {
        return items.size();
    }

    public void addItem(Person person){
        items.add(person);
    }


    @Override
    public boolean onItemMove(int from_position, int to_position) {
        //이동할 객체 저장
        Person person = items.get(from_position);
        //이동할 객체 삭제
        items.remove(from_position);
        //이동하고 싶은 position에 추가
        items.add(to_position,person);

        //Adapter에 데이터 이동알림
        notifyItemMoved(from_position,to_position);
        return true;
    }

    @Override
    public void onItemSwipe(int position) {
        items.remove(position);
        notifyItemRemoved(position);
    }


    //왼쪽 버튼 누르면 수정할 다이얼로그 띄우기
    @Override
    public void onLeftClick(int position, RecyclerView.ViewHolder viewHolder) {
        //수정 버튼 클릭시 다이얼로그 생성
        CustomDialog dialog = new CustomDialog(context, position, items.get(position));

        //화면 사이즈 구하기
        DisplayMetrics dm = context.getApplicationContext().getResources().getDisplayMetrics();
        int width = dm.widthPixels;
        int height = dm.heightPixels;

        //다이얼로그 사이즈 세팅
        WindowManager.LayoutParams wm = dialog.getWindow().getAttributes();
        wm.copyFrom(dialog.getWindow().getAttributes());
        wm.width = (int) (width * 0.7);
        wm.height = height/2;

        //다이얼로그 Listener 세팅
        dialog.setDialogListener(this);

        //다이얼로그 띄우기
        dialog.show();
    }


    //오른쪽 버튼 누르면 아이템 삭제
    @Override
    public void onRightClick(int position, RecyclerView.ViewHolder viewHolder) {
        items.remove(position);
        notifyItemRemoved(position);
    }

    @Override
    public void onFinish(int position, Person person) {
        items.set(position,person);
        notifyItemChanged(position);
    }


    class ItemViewHolder extends RecyclerView.ViewHolder {

        TextView list_name,list_age;
        ImageView list_image;


        public ItemViewHolder(View itemView) {
            super(itemView);
            list_name = itemView.findViewById(R.id.list_name);
            list_age = itemView.findViewById(R.id.list_age);
            list_image = itemView.findViewById(R.id.list_image);
        }

        public void onBind(Person person) {
            list_name.setText(person.getName());
            list_age.setText(String.valueOf(person.getAge()));
            list_image.setImageResource(person.getImage());
        }
    }


}
10. MainActivity.java
package com.everyshare.recyclerviewtest;

import android.graphics.Canvas;
import android.os.Bundle;

import androidx.annotation.NonNull;
import androidx.appcompat.app.AppCompatActivity;
import androidx.recyclerview.widget.ItemTouchHelper;
import androidx.recyclerview.widget.LinearLayoutManager;
import androidx.recyclerview.widget.RecyclerView;

public class MainActivity extends AppCompatActivity {
    RecyclerView rv;
    ListAdapter adapter;
    ItemTouchHelper helper;
    @Override
    protected void onCreate(Bundle savedInstanceState) {
        super.onCreate(savedInstanceState);
        setContentView(R.layout.activity_main);


        rv = findViewById(R.id.rv);
        //RecyclerView의 레이아웃 방식을 지정
        LinearLayoutManager manager = new LinearLayoutManager(this);
        manager.setOrientation(LinearLayoutManager.VERTICAL);
        rv.setLayoutManager(manager);

        //RecyclerView의 Adapter 세팅
        adapter = new ListAdapter(this);
        rv.setAdapter(adapter);

        //ItemTouchHelper 생성
        helper = new ItemTouchHelper(new ItemTouchHelperCallback(adapter));
        //RecyclerView에 ItemTouchHelper 붙이기
        helper.attachToRecyclerView(rv);


        //Adapter에 데이터 추가
        Person person1 = new Person(R.drawable.image1,"파이리",1);
        Person person2 = new Person(R.drawable.image2,"피카츄",2);
        Person person3 = new Person(R.drawable.image3,"꼬부기",3);
        Person person4 = new Person(R.drawable.image4,"이상해씨",4);
        adapter.addItem(person1);
        adapter.addItem(person2);
        adapter.addItem(person3);
        adapter.addItem(person4);
    }

    private void setUpRecyclerView(){
        rv.addItemDecoration(new RecyclerView.ItemDecoration() {
            @Override
            public void onDraw(@NonNull Canvas c, @NonNull RecyclerView parent, @NonNull RecyclerView.State state) {
                helper.onDraw(c,parent, state);
            }
        });
    }
}
끝까지 보시고 이해가 안되시는 부분이 있으시다면 댓글을 남겨주세요.
명확한 답변을 드릴지는 모르겠지만 아는선에서 도움이 되는 답변을 드리도록 하겠습니다.
감사합니다.
반응형


